
This is similar to the led example but this time we attach an RGB led
The example is similar to the Control an LED from a Web browser with an Arduino example, so we won’t dwell on the details of that example too much but we will crack on and show you schematics, layout and code for this example.
One thing to note is that in this example I had a common cathode RGB led, if you have a common anode type you will have to modify the code (reverse the settings – low will be on, high would be off)
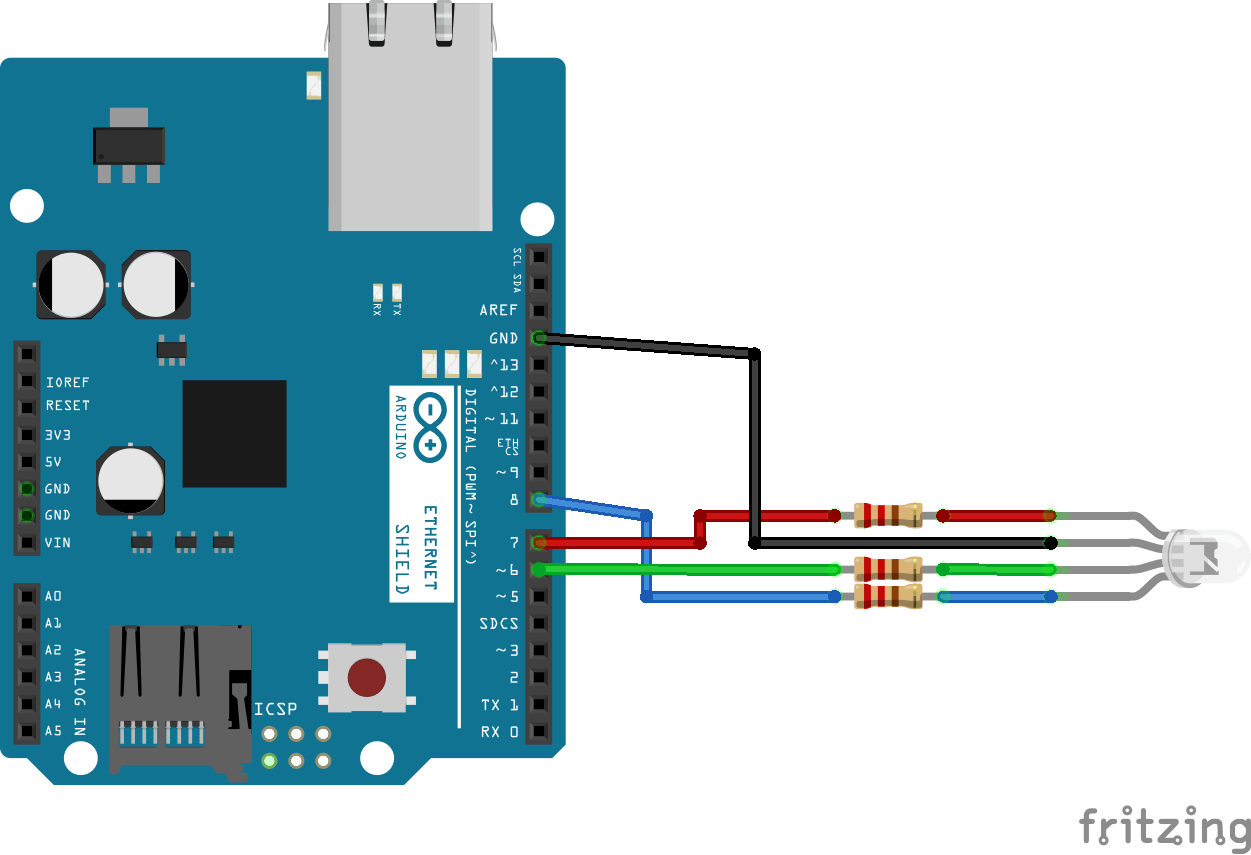
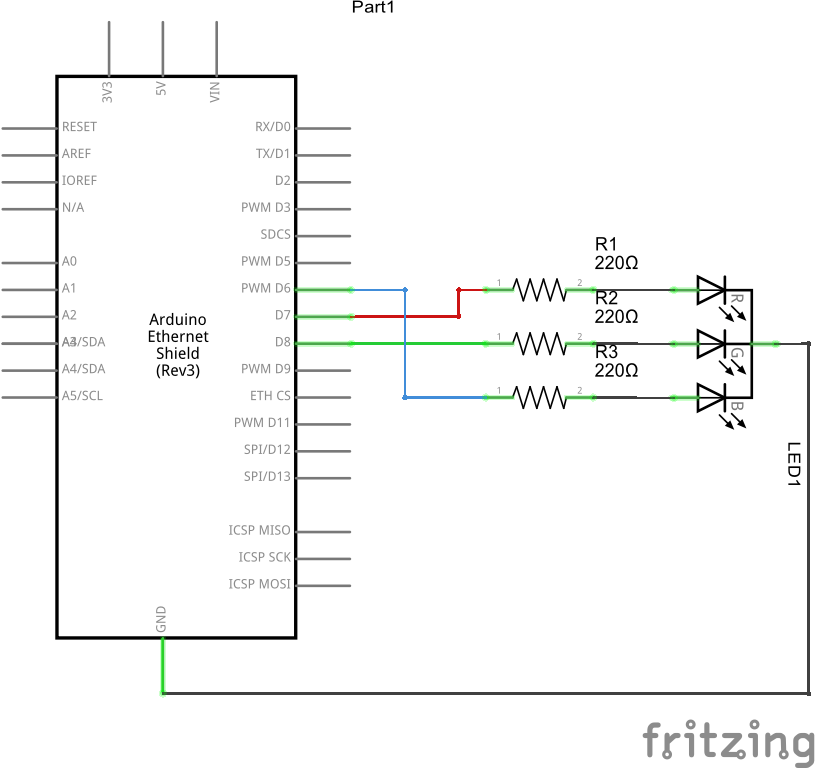
Schematic
Here is a schematic and breadboard layout
Code
[codesyntax lang=”cpp”]
#include <SPI.h>
#include <Ethernet.h>

#include <Servo.h>
Servo myservo;  // create servo object to control a servo

byte mac[] = { 0xDE, 0xAD, 0xBE, 0xEF, 0xFE, 0xED }; //physical mac address
byte ip[] = { 192, 168, 0, 177 }; // ip in lan
byte gateway[] = { 192, 168, 0, 1 }; // internet access via router
byte subnet[] = { 255, 255, 255, 0 }; //subnet mask
EthernetServer server(80); //server port

String readString;

//////////////////////

void setup(){

pinMode(6, OUTPUT); //pin selected to control
pinMode(7, OUTPUT); //pin selected to control
pinMode(8, OUTPUT); //pin selected to control
//start Ethernet
Ethernet.begin(mac, ip, gateway, subnet);
server.begin();
//the pin for the servo co
//enable serial data print
Serial.begin(9600);
Serial.println("server LED test 1.0"); // so I can keep track of what is loaded
}

void loop(){
// Create a client connection
EthernetClient client = server.available();
if (client)
{
while (client.connected())
{
if (client.available())
{
char c = client.read();

//read char by char HTTP request
if (readString.length() < 100)
{

//store characters to string
readString += c;
//Serial.print(c);
}

//if HTTP request has ended
if (c == '\n') {

///////////////
Serial.println(readString); //print to serial monitor for debuging

client.println("HTTP/1.1 200 OK"); //send new page
client.println("Content-Type: text/html");
client.println();

client.println("<HTML>");
client.println("<HEAD>");
client.println("<TITLE>RGB LED on/off</TITLE>");
client.println("</HEAD>");
client.println("<BODY>");
client.println("<H1>RGB LED On/Off</H1>");
client.println("<hr />");
client.println("<br />");

client.println("<a href=\"/?blueon\"\">Turn On blue</a>");
client.println("<a href=\"/?blueoff\"\">Turn Off blue</a><br />");
client.println("<br />");
client.println("<a href=\"/?redon\"\">Turn On red</a>");
client.println("<a href=\"/?redoff\"\">Turn Off red</a><br />");
client.println("<br />");
client.println("<a href=\"/?greenon\"\">Turn On green</a>");
client.println("<a href=\"/?greenoff\"\">Turn Off green</a><br />");
client.println("</BODY>");
client.println("</HTML>");

delay(1);
//stopping client
client.stop();

///////////////////// control arduino pin 6
if(readString.indexOf("?blueon") >0)//checks for on
{
digitalWrite(6, HIGH);    // set pin 6 high
Serial.println("Blue On");
}
else
{
if(readString.indexOf("?blueoff") >0)//checks for off
{
digitalWrite(6, LOW);    // set pin 6 low
Serial.println("Blue off");
}
}
///////////////////// control arduino pin 7
if(readString.indexOf("?redon") >0)//checks for on
{
digitalWrite(7, HIGH);    // set pin 7 high
Serial.println("Red On");
}
else
{
if(readString.indexOf("?redoff") >0)//checks for off
{
digitalWrite(7, LOW);    // set pin 7 low
Serial.println("Red off");
}
}
///////////////////// control arduino pin 8
if(readString.indexOf("?greenon") >0)//checks for on
{
digitalWrite(8, HIGH);    // set pin 8 high
Serial.println("Green On");
}
else
{
if(readString.indexOf("?greenoff") >0)//checks for off
{
digitalWrite(8, LOW);    // set pin 8 low
Serial.println("Green off");
}
}
//clearing string for next read
readString="";

}
}
}
}
}
[/codesyntax]
Testing
Navaigate to http://192.168.0.177 and you should the following
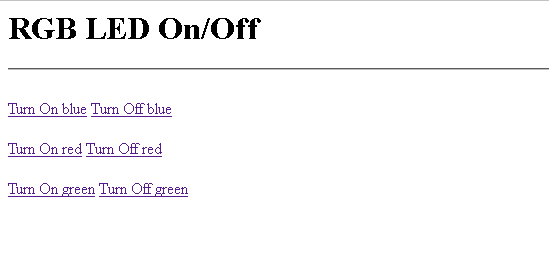
Click on the links to switch on and off the leds
Link
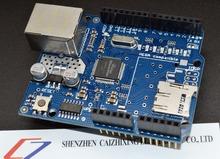 1pcs UNO Shield Ethernet Shield W5100 R3 UNO Mega 2560
