
In this article we look at the Seeeduino XIAO.
It is a very small board the size of your thumb but has many features packed in, there are expansion boards available making it easy to connect other sensors and modules.
There is a fairly powerful little processor – a 32-bit Arm-Cortex-M0 + processor core, which runs at 48 MHz and has 256 KB flash memory and 64 KB SRAM
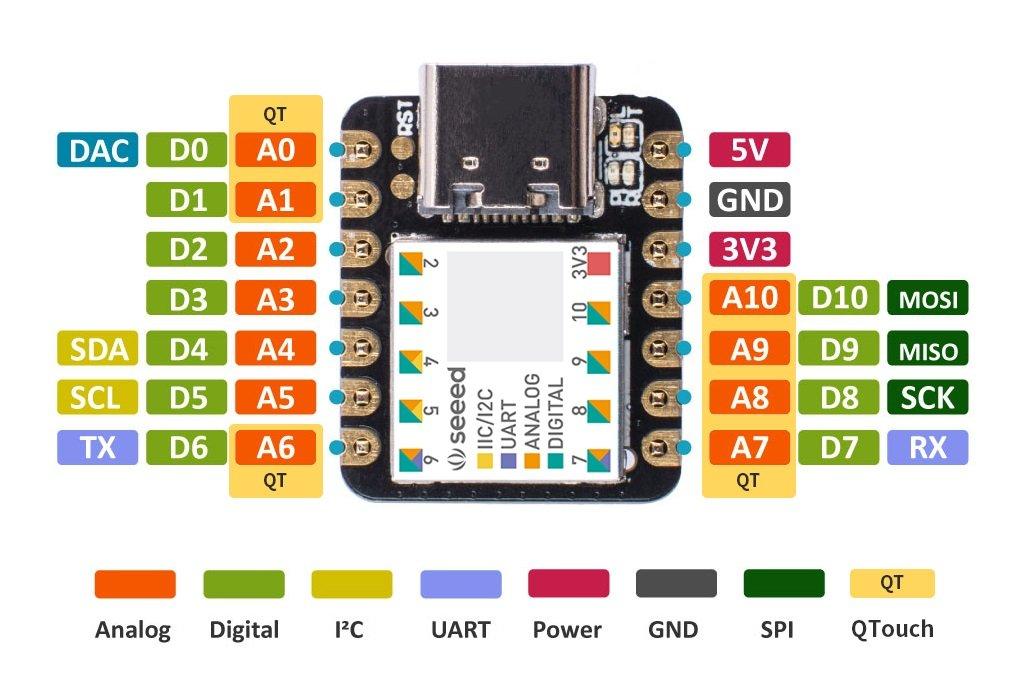
The Seeeduino XIAO has 14 GPIO PINs, which can be used for 11 digital interfaces, 11 mock interfaces, 10 PWM interfaces, 1 DAC output pin, 1 I2C interface, 1 SPI interface, 1 UART interface – so plenty of connection options
The board has arduino support by installing a board package.
The pins are 3.3v tolerant only – something else to be wary of if you are coming from an Arduino
Features
| Description | Value |
|---|---|
| CPU | ARM Cortex-M0+ CPU(SAMD21G18) running at up to 48MHz |
| Flash Memory | 256KB |
| SRAM | 32KB |
| Digital I/O Pins | 11 |
| Analog I/O Pins | 11 |
| I2C interface | 1 |
| SPI interface | 1 |
| QTouch | 7 (A0,A1,A6,A7,A8,A9,A10) |
| UART interface | 1 |
| Power supply and downloading interface | Type-C |
| Power | 3.3V/5V DC |
Power
Power is supplied via a USB type c connector, there is an on board voltage regulator to convert from 5v to 3.3v
Pins
Each of the 11 digital pins on the Seeed Lotus can be used as an input or output. Voltage input connected to general I/O pins may cause damage if it’is higher than 3.3V .
The Seeeduino XIAO has11 analog inputs, each of which provide 12 bits of resolution. That means the analog input values can range from 0-4095, representing a voltage between 0 and 3.3V. To use the ADC’s in 12-bit mode, make sure you you use the function analogReadResolution(12) in your sketch.
Serial: pin 6 as the TX pin of UART(RX pin of UART is pin 7)
Interrupts : All pins on Seeeduino XIAO support interrupts, but two pins cannot be used at the same time: 5 pin and 7 pin
PWM: 10 PWM Pins
SPI: pin 8 as the SCK pin of SPI(MISO pin of SPI is pin 9,MOSI pin of SPI is pin 10):
TWI/I2C: pin 5 as the SCL pin of IIC(SDA pin of IIC is pin 4):
DAC : 1 DAC output on A0. This module can produce an analog voltage between 0 and 3.3V.
The DAC is only available on the Arduino pin A0, and is controlled using analogWrite(A0 ). The DAC can be set up to 10-bit resolution by using analogWriteResolution(10) in your sketch, this means values between 0 and 1023 will set the voltage to somewhere between 0 and 3.3V.
QTouch : 7 in total on pins A0,A1,A6,A7,A8,A9,A10
Built in LED : The behavior of the built-in LED is the opposite to an Arduino. On the Xiao, the pin has to be pulled low, whereas on other micro-controllers it has to be pulled high.
Installation
The board works with the desktop IDE but you need to support for the board
Open your Arduino IDE, click on File > Preferences, and copy below url to Additional Boards Manager URLs
https://raw.githubusercontent.com/Seeed-Studio/Seeed_Platform/master/package_legacy_seeeduino_boards_index.json
Click Tools-> Board-> Boards Manager…, type in “Seeeduino XIAO” in the search box. You should see a listing for “Seeed SAMD Boards”. Install it.
Cost
| Site | Link | Price |
| Amazon.com | ||
| Aliexpress | Seeeduino XIAO SAMD21 Cortex M0+ | $6.31 |
| Amazon.co.uk | Haude Type-C Seeeduino XIAO Microcontroller SAMD21 Cortex M0+ 48MHZ SPI I2C Interface for IDE/IOT System Tool | £11.75 |
Summary
