
Although it an older Arduino board in this article we look at the Arduino Mega 2560. This as well as the Arduino Uno is still what I would recommend for beginners
The Arduino mega 2560 has many more I/O pins available, so if you need that then this is ideal – the board is bigger though but there are plenty of proto shields and cases available, so you can use this in your project.

There are more Analog pins and more code space available for bigger sketches – if required. It also supports 5v and 3.3v inputs – unlike some of the other development boards.
This is an easy to use board with an abundance of examples available online and the IDE works with the board out of the box.
I have seen articles saying that an Uno shield will work with this but this may be incorrect as some pins, like the I2C and the SPI ones are in different location on the Mega – so you should check them out first. You may be out of luck.
Features
The ATmega2560 has 256 KB of flash memory for storing code (of which 8 KB is used for the bootloader), 8 KB of SRAM and 4 KB of EEPROM. If you use the EEPROM library you can read and write to the EEPROM.
| Microcontroller | ATmega2560 |
| Operating Voltage | 5V |
| Input Voltage (recommended) | 7-12V |
| Input Voltage (limit) | 6-20V |
| Digital I/O Pins | 54 (of which 15 provide PWM output) |
| Analog Input Pins | 16 |
| DC Current per I/O Pin | 20 mA |
| DC Current for 3.3V Pin | 50 mA |
| Flash Memory | 256 KB of which 8 KB used by bootloader |
| SRAM | 8 KB |
| EEPROM | 4 KB |
| Clock Speed | 16 MHz |
| LED_BUILTIN | 13 |
Power
The power pins are as follows:
- Vin. The input voltage to the board when it’s using an external power source. You can supply voltage through this pin, or, if supplying voltage via the power jack, access it through this pin.
- 5V. This pin outputs a regulated 5V from the regulator on the board. The board can be supplied with power either from the DC power jack (7 – 12V), the USB connector (5V), or the VIN pin of the board (7-12V). Supplying voltage via the 5V or 3.3V pins bypasses the on-board regulator, and can damage the board.
- 3V3. A 3.3 volt supply generated by the on-board regulator. Maximum current draw is 50 mA.
- GND. Ground pins.
- IOREF. This pin on the board provides the voltage reference with which the microcontroller operates. A properly configured shield can read the IOREF pin voltage and select the appropriate power source or enable voltage translators on the outputs for working with the 5V or 3.3V.
Pins
Each of the 54 digital pins on the Mega can be used as an input or output. They are all 5 volt tolerant. A maximum of 40mA is the value that must not be exceeded to avoid damaging the microcontroller.
The Mega 2560 has 16 analog inputs, each of which provide 10 bits of resolution. By default they measure from ground to 5 volts, though is it possible to change the upper end of their range using the AREF pin and analogReference() function.
Serial: 0 (RX) and 1 (TX); Serial 1: 19 (RX) and 18 (TX); Serial 2: 17 (RX) and 16 (TX); Serial 3: 15 (RX) and 14 (TX). Used to receive (RX) and transmit (TX) TTL serial data.
External Interrupts: 2 (interrupt 0), 3 (interrupt 1), 18 (interrupt 5), 19 (interrupt 4), 20 (interrupt 3), and 21 (interrupt 2). These pins can be configured to trigger an interrupt on a low level, a rising or falling edge, or a change in level.
PWM: Available on Pins 2 to 13 and Pins 44 to 46. Provide 8-bit PWM output.
SPI: 50 (MISO), 51 (MOSI), 52 (SCK), 53 (SS). These pins support SPI communication. The SPI pins are also broken out on the ICSP header.
LED: 13. There is a built-in LED connected to digital pin 13. When the pin is HIGH the LED is on, when the pin is LOW, it’s off.
TWI/I2C : 20 (SDA) and 21 (SCL). Support TWI communication.
AREF. Reference voltage for the analog inputs. Used with analogReference().
Reset. Bring this line LOW to reset the microcontroller. Typically used to add a reset button to shields which block the one on the board.
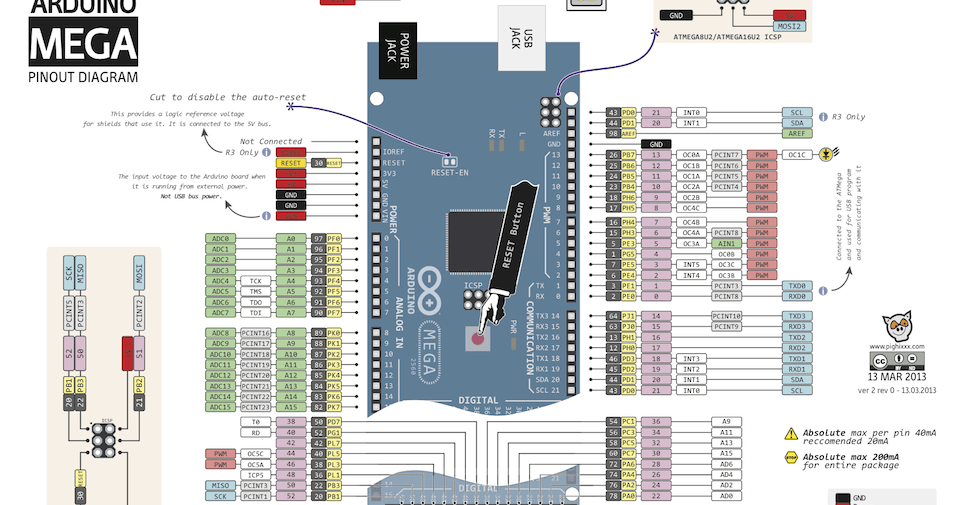
Here is a pinout of the board
Installation
The board works out the box with the desktop IDE and the online IDE.
Many examples online
Cost
The price varies wildly on these boards – these are all clone options and all affiliate links.
| Site | Link | Price |
| Amazon.com | KEYESTUDIO Mega 2560 R3 Board for Arduino Projects with USB Cable | $17.49 |
| Aliexpress | MEGA2560 USB board Development board | $7.65 |
| Amazon.co.uk | SUNFOUNDER Mega 2560 R3 ATmega2560-16AU Controller Board For Arduino | £12.99 |
Summary
If you need more I/O pins and more code space then this board is ideal.
Its also a low cost option although generally this is the case if you buy a clone board. You can see this in the listings above.
