
A simple way of adding network access to your Arduino Uno and Mega is the Ethernet Shield, there are a few clones out there but they all generally work the same way.
The Arduino Ethernet Shield allows an Arduino board to connect to the internet. It is based on the Wiznet W5100 ethernet chip (datasheet). The Wiznet W5100 provides a network (IP) stack capable of both TCP and UDP. It supports up to four simultaneous socket connections. Use the Ethernet library to write sketches which connect to the internet using the shield. The ethernet shield connects to an Arduino board using long wire-wrap headers which extend through the shield. This keeps the pin layout intact and allows another shield to be stacked on top.
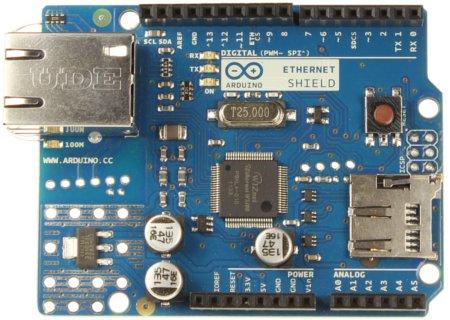
The most recent revision of the board exposes the 1.0 pinout on rev 3 of the Arduino UNO board.
The Ethernet Shield has a standard RJ-45 connection, with an integrated line transformer and Power over Ethernet enabled.
There is an onboard micro-SD card slot, which can be used to store files for serving over the network. It is compatible with all the Arduino/Genuino boards. The on-board micro SD card reader is accessible through the SD Library. When working with this library, SS is on Pin 4. The original revision of the shield contained a full-size SD card slot; this is not supported.
The shield also includes a reset controller, to ensure that the W5100 Ethernet module is properly reset on power-up. Previous revisions of the shield were not compatible with the Mega and need to be manually reset after power-up.
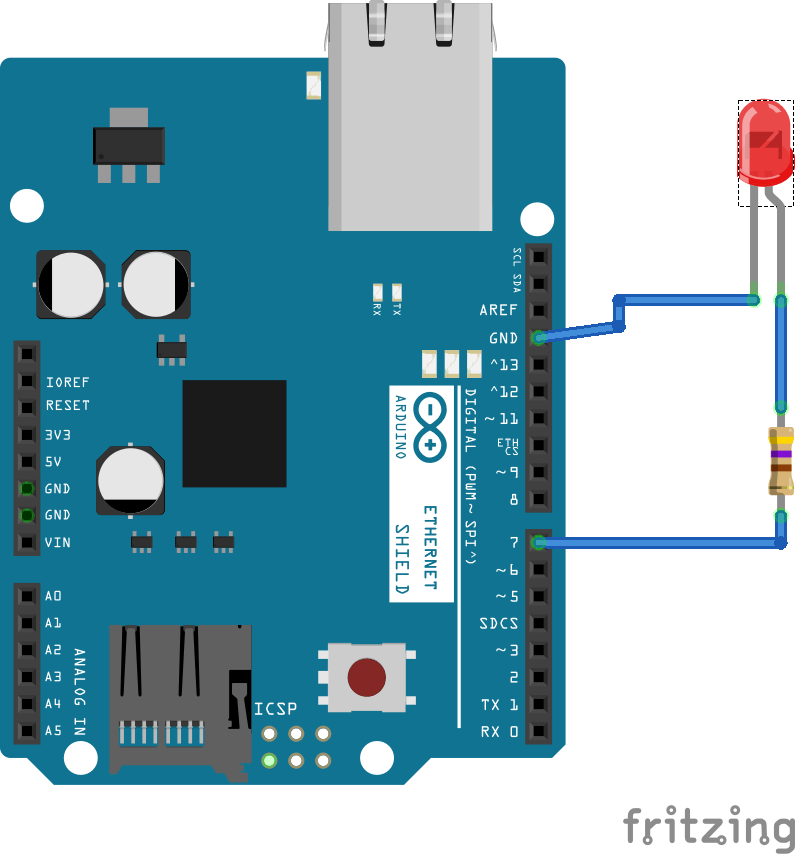
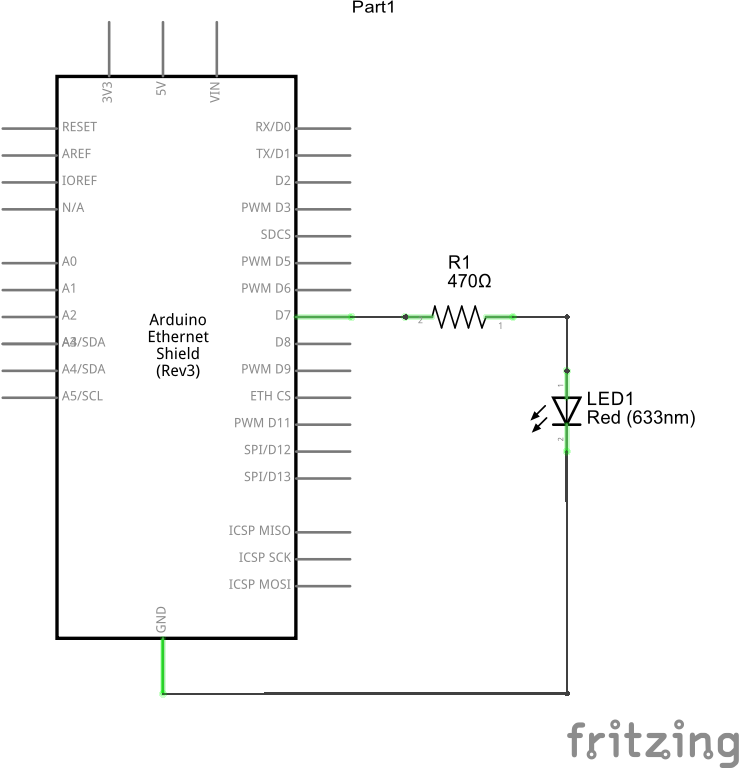
This example requires an ethernet shield and an LED connected to pin 6.
Copy the code into a new sketch and upload it to your arduino and then open your web browser to http://192.168.1.177
Schematics
Code
[codesyntax lang=”cpp”]
#include <SPI.h>
#include <Ethernet.h>

#include <Servo.h>
Servo myservo;  // create servo object to control a servo

byte mac[] = { 0xDE, 0xAD, 0xBE, 0xEF, 0xFE, 0xED }; //physical mac address
byte ip[] = { 192, 168, 1, 177 }; // ip in lan
byte gateway[] = { 192, 168, 1, 1 }; // internet access via router
byte subnet[] = { 255, 255, 255, 0 }; //subnet mask
EthernetServer server(80); //server port

String readString;

//////////////////////

void setup(){

pinMode(6, OUTPUT); //pin selected to control
//start Ethernet
Ethernet.begin(mac, ip, gateway, subnet);
server.begin();
//the pin for the servo co
//enable serial data print
Serial.begin(9600);
Serial.println(“server LED test 1.0″); // so I can keep track of what is loaded
}

void loop(){
// Create a client connection
EthernetClient client = server.available();
if (client) {
while (client.connected()) {
if (client.available()) {
char c = client.read();

//read char by char HTTP request
if (readString.length() < 100) {

//store characters to string
readString += c;
//Serial.print(c);
}

//if HTTP request has ended
if (c == ‘\n’) {

///////////////
Serial.println(readString); //print to serial monitor for debuging

client.println(“HTTP/1.1 200 OK”); //send new page
client.println(“Content-Type: text/html”);
client.println();

client.println(“<HTML>”);
client.println(“<HEAD>”);
client.println(“<TITLE>LED on/off</TITLE>”);
client.println(“</HEAD>”);
client.println(“<BODY>”);
client.println(“<H1>LED On/Off</H1>”);
client.println(“<hr />”);
client.println(“<br />”);

client.println(“<a href=\”/?lighton\”\”>Turn On Light</a>”);
client.println(“<a href=\”/?lightoff\”\”>Turn Off Light</a><br />”);

client.println(“</BODY>”);
client.println(“</HTML>”);

delay(1);
//stopping client
client.stop();

///////////////////// control arduino pin
if(readString.indexOf(“?lighton”) >0)//checks for on
{
digitalWrite(6, HIGH);    // set pin 4 high
Serial.println(“Led On”);
}
else
{
if(readString.indexOf(“?lightoff”) >0)//checks for off
{
digitalWrite(6, LOW);    // set pin 4 low
Serial.println(“Led Off”);
}
}
//clearing string for next read
readString=””;

}
}
}
}
}
[/codesyntax]
Testing
Navigate with your favourite web browser to the IP address in the code, in this case http://192.168.0.177/
You should see a web page like the following

Click the two links to switch ona nd off the led attached to the Arduino
Links
 1pcs UNO Shield Ethernet Shield W5100 R3 UNO Mega 2560
