
In this example we will take the BMP180, read the temperature and send this data to an online IoT platform, in this case we will use Thingspeak. To achieve this we will need an Arduino Uno with an Ethernet shield fitted and then we will connect the BMP180 sensor to this.
We covered the BMP180 a little in the Linkit One and BMP180 example so we will focus on the thingspeak part and arduino code here
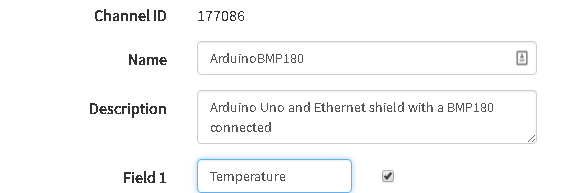
You will now need to create a new account at thingspeak – https://thingspeak.com. Once done create a new channel and add one new field called temperature. You can see this in a screen capture of my simple channel, notice the ChannelID you will need that in your code later. You can also fill in other fields such as Name, description and there are a few others as well. The key one(s) is the Field1 – this effectively is the data you send to thingspeak
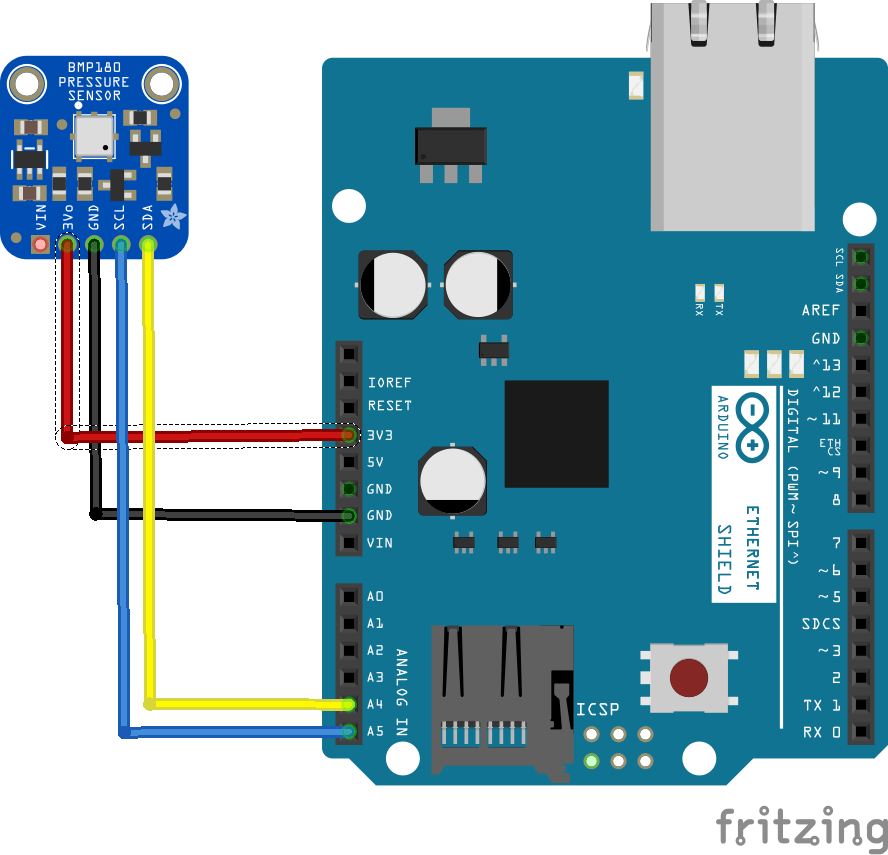
Layout
This layout shows the BMP180 connected to the ethernet shield
Code
You will need to install the thingspeak library first of all. 2 options here
In the Arduino IDE, choose Sketch/Include Library/Manage Libraries. Click the ThingSpeak Library from the list, and click the Install button.
— or —
- Download the ZIP file from https://github.com/mathworks/thingspeak-arduino to your machine.
- In the Arduino IDE, choose Sketch/Include Library/Add Zip Library
- Navigate to the ZIP file, and click Open
You will also need the Adafruit BMP085 library for this example, you can either download it or use the library manager in newer Arduino IDEs similar to th eThingSpeak library
https://github.com/adafruit/Adafruit-BMP085-Library
Here is the code, its basically a merge of a basic BMP180 example and the thingspeak WriteVoltage example with a lot of the hardware specific code removed – so it only works for an Arduino Uno and an Ethernet shield whereas the WriteVoltaghe example can cater for various pieces of hardware such as an ESP8266, WiFi shield, Arduino Yun
[codesyntax lang=”cpp”]
#define USE_ETHERNET_SHIELD

#include "ThingSpeak.h"
#include <Wire.h>
#include <Adafruit_BMP085.h>
#include <SPI.h>
#include <Ethernet.h>

byte mac[] = { 0xDE, 0xAD, 0xBE, 0xEF, 0xFE, 0xED};

EthernetClient client;
Adafruit_BMP085 bmp;

//you will get these from thingspeak
unsigned long myChannelNumber = 100000;
const char * myWriteAPIKey = "apikeyinhere";

void setup()
{
  //start the serial
  Serial.begin(9600);
  //network stuff
  Ethernet.begin(mac);
  ThingSpeak.begin(client);
  //start the sensor
  if (!bmp.begin())
  {
    Serial.println("Could not find BMP180 or BMP085 sensor at 0x77");
    while (1) {}
  }
}

void loop()
{

  // Write to ThingSpeak. There are up to 8 fields in a channel, allowing you to store up to 8 different
  // pieces of information in a channel.  Here, we write to field 1.
  ThingSpeak.writeField(myChannelNumber, 1, bmp.readTemperature(), myWriteAPIKey);
  delay(20000); // ThingSpeak will only accept updates every 15 seconds.
}
[/codesyntax]
Testing
Navigate to your thingspeak channel and take a look at the private view, all going well you should see a nice graph of data. You can actually get code and embed this on another site, so here it is below. You can also play about with colours and more
Note the data will look rubbish as I have disconnected the sensor, the image is to show you that you should see some readings
Further Steps
There are obviously alternatives to thingspeak which we will look at and we are only scratching the surface using one field when 8 are available. This example used a specific hardware combination and we will look at others in future articles.
We also only sent temperature data when the bmp180 can also send pressure data, so thats another option
Links
https://thingspeak.com/channels/177086 – this channel
BMP180 Replace BMP085 Digital Barometric Pressure Sensor Board Module For Arduino
