
In this first project we will show you a few methods of creating a simple dice rolling game using a Micro:bit, we will display the number 1 to 6 on the LED matrix and we will also show examples that display the actual dice spots on the matrix.
Block Editor and JavaScript examples
For this first group of examples we will use the block editor and JavaScript at https://makecode.microbit.org/
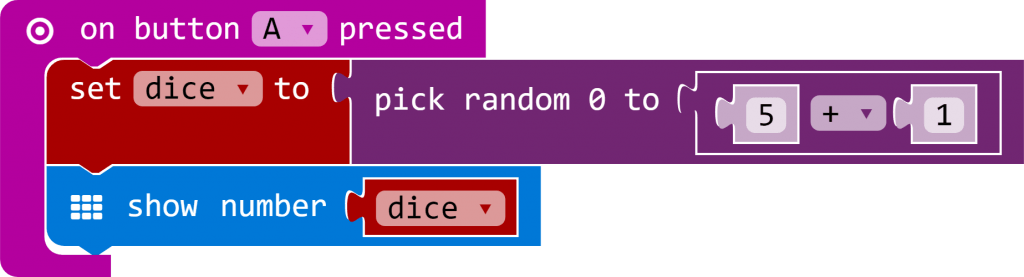
In this first example we will simply display a random number from 1 to 6 on the micro:bit LED matrix, this is the blocks example. We will use the button A to trigger a roll of the dice, we create a variable called dice to store the number generated, since the random number generated is in the range 0 to 5 we simply add 1 to it. We then show that number on the led matrix using the show number block which takes the dice variable as its parameter
This is what you need to create
If you prefer JavaScript, here is the code for the example above – the editor make sit easy to switch between both
[codesyntax lang=”javascript”]
[/codesyntax]
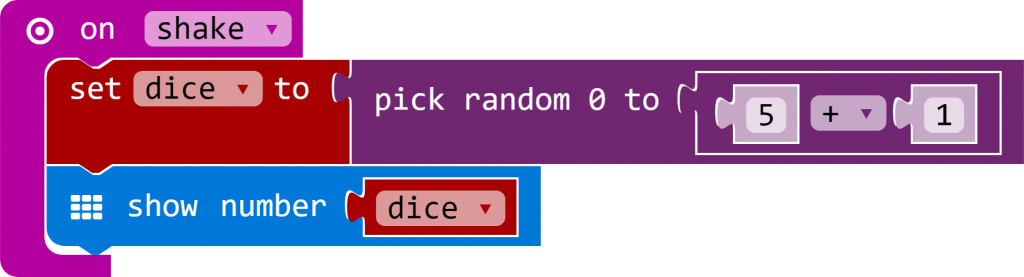
Of course a smarter way of doing this is rather than pressing a button to roll the dice, we shake the micro:bit as if we were physically rolling the dice – we will use the on shake block to do this. You need to create something like this
And again here is the JavaScript code for the example above
[codesyntax lang=”javascript”]
})
[/codesyntax]
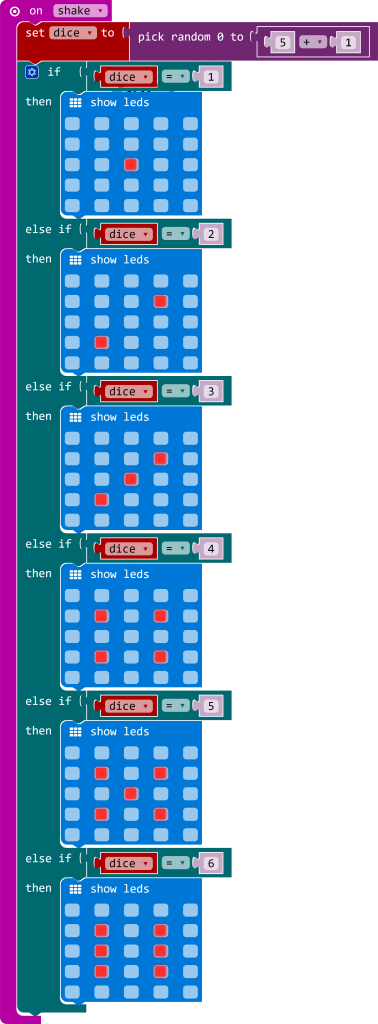
Now this is good so far but it is not really a dice is it, as we said at the start we associate the number of spots to match the number thrown. For the next example we will need to check the variable value using an if block with else if’s for each number.
For example if the number generated is 6 we want to display the number 6 via the show LEDS block.
You can see this in the complete example underneath
Again for the JavaScript fans, this is the code for the above example
[codesyntax lang=”javascript”]
let dice = 0
input.onGesture(Gesture.Shake, () => {
    dice = Math.random(5 + 1 + 1)
    if (dice == 1) {
        basic.showLeds(`
            . . . . .
            . . . . .
            . . # . .
            . . . . .
            . . . . .
            `)
    } else if (dice == 2) {
        basic.showLeds(`
            . . . . .
            . . . # .
            . . . . .
            . # . . .
            . . . . .
            `)
    } else if (dice == 3) {
        basic.showLeds(`
            . . . . .
            . . . # .
            . . # . .
            . # . . .
            . . . . .
            `)
    } else if (dice == 4) {
        basic.showLeds(`
            . . . . .
            . # . # .
            . . . . .
            . # . # .
            . . . . .
            `)
    } else if (dice == 5) {
        basic.showLeds(`
            . . . . .
            . # . # .
            . . # . .
            . # . # .
            . . . . .
            `)
    } else if (dice == 6) {
        basic.showLeds(`
            . . . . .
            . # . # .
            . # . # .
            . # . # .
            . . . . .
            `)
    }
})
[/codesyntax]
Python Examples
This next examples are written in python, it is back to one of the original examples where we shake the micro:bit and a random number is generated and we then display the number on the led matrix
For these examples we use the online Micropython editor option from https://www.microbit.co.uk/app/. You compile this and a hex file will be downloaded to your PC, you then drag this into your local drive that was created when you plugged in your micro:bit and this uploads the hex file to the device.
You could use MU editor as well if you prefer to use an IDE
You should then be able to shake the device and see a pseudo random number appear.
[codesyntax lang=”python”]
from microbit import *
import random
display.show('-')
while True:
    if accelerometer.was_gesture('shake'):
        display.clear()
        sleep(1000)
        display.show(str(random.randint(1, 6)))
    sleep(10)
[/codesyntax]
Again the example does not really simulate a true dice, lets fix this in this python example which will display the images to represent the faces of the dice
[codesyntax lang=”python”]
from microbit import *
import random

one = Image("00000:"
            "00000:"
            "00900:"
            "00000:"
            "00000")

two = Image("00000:"
            "09000:"
            "00000:"
            "00090:"
            "00000")

three = Image("90000:"
              "00000:"
              "00900:"
              "00000:"
              "00009")

four = Image("00000:"
             "09090:"
             "00000:"
             "09090:"
             "00000")

five = Image("00000:"
             "09090:"
             "00900:"
             "09090:"
             "00000")

six = Image("09090:"
            "00000:"
            "09090:"
            "00000:"
            "09090")

display.scroll('Shake me!')

while True:
    if accelerometer.was_gesture('shake'):
        throw = random.randint(1, 6)
        if throw == 1:
            display.show(one)
        if throw == 2:
            display.show(two)
        if throw == 3:
            display.show(three)
        if throw == 4:
            display.show(four)
        if throw == 5:
            display.show(five)
        if throw == 6:
            display.show(six)
[/codesyntax]
Again download this example to your PC, copy it to your micro:bit and there we go we now have a better dice example written in python
