
In this example we will connect an RGB led to a Wemos Mini, we will then create an example web page that will display buttons to switch on and off the various individual leds of an RGB led.
Our code example is based on a common cathode RGB led type, if you have a common anode type t hen you would have to invert the code, for example a high from an output would switch an led off and a low would switch it on.
Lets look at the Wemos MIni
Here is a picture I took of one alongside an Arduino Nano
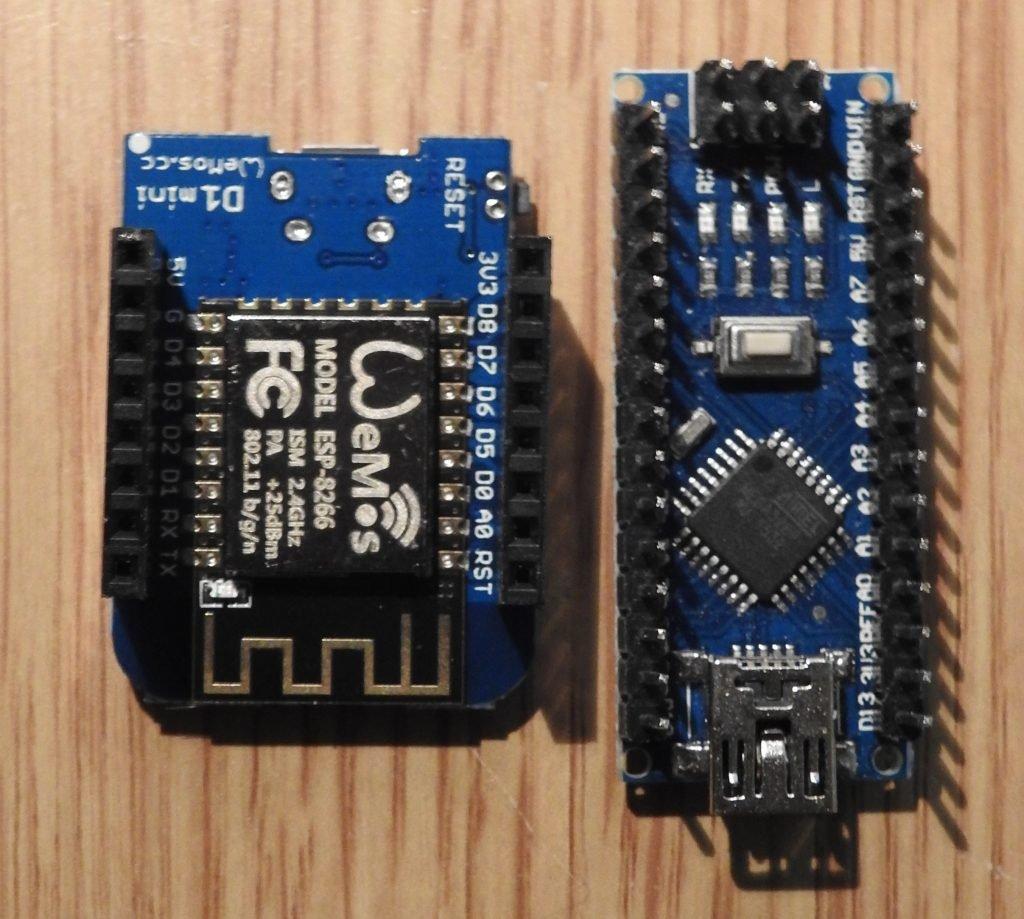
As you can see its nice and compact for any projects where space is an issue. Another great feature for ease of development is the ability to use the Arduino IDE or NodeMCU. this means you can get up and running quickly. The pin headers are located in a sensible layout, so it looks easy to create your own basic shields for the board
Lets look at some basic specs, the operating voltage and the input voltage to Analog are critical, remember this is a 3.3v board
| Microcontroller | ESP-8266EX |
| Operating Voltage | 3.3V |
| Digital I/O Pins | 11 |
| Analog Input Pins | 1(Max input: 3.2V) |
| Clock Speed | 80MHz/160MHz |
| Flash | 4M bytes |
Here are the pin functions
| Pin | Function | ESP-8266 Pin |
| TX | TXD | TXD |
| RX | RXD | RXD |
| A0 | Analog input, max 3.3V input | A0 |
| D0 | IO | GPIO16 |
| D1 | IO, SCL | GPIO5 |
| D2 | IO, SDA | GPIO4 |
| D3 | IO, 10k Pull-up | GPIO0 |
| D4 | IO, 10k Pull-up, BUILTIN_LED | GPIO2 |
| D5 | IO, SCK | GPIO14 |
| D6 | IO, MISO | GPIO12 |
| D7 | IO, MOSI | GPIO13 |
| D8 | IO, 10k Pull-down, SS | GPIO15 |
| G | Ground | GND |
| 5V | 5V | – |
| 3V3 | 3.3V | 3.3V |
| RST | Reset | RST |
So to summarise, the Wemos D1 mini has
- 11 digital input/output pins, all pins have interrupt/pwm/I2C/one-wire supported(except D0)
- 1 analog input(3.2V max input)
- a Micro USB connection
- Compatible with Arduino
- Compatible with nodemcu
Now back to the RGB led controlled via a web page example
Parts List
| Label | Part Type | Properties |
|---|---|---|
| LED1 | RGB LED (com. cathode, rgb) | rgb RGB; package 5 mm [THT]; polarity common cathode; pin order rgb |
| R1 | 1kΩ Resistor | resistance 1kΩ; pin spacing 400 mil; bands 4; package THT; tolerance ±5% |
| R2 | 1kΩ Resistor | resistance 1kΩ; pin spacing 400 mil; bands 4; package THT; tolerance ±5% |
| R3 | 1kΩ Resistor | resistance 1kΩ; pin spacing 400 mil; bands 4; package THT; tolerance ±5% |
| WeMos D1 Mini1 | WeMos D1 Mini | headers female above; variant variant 1; cpu ESP-8266EX |
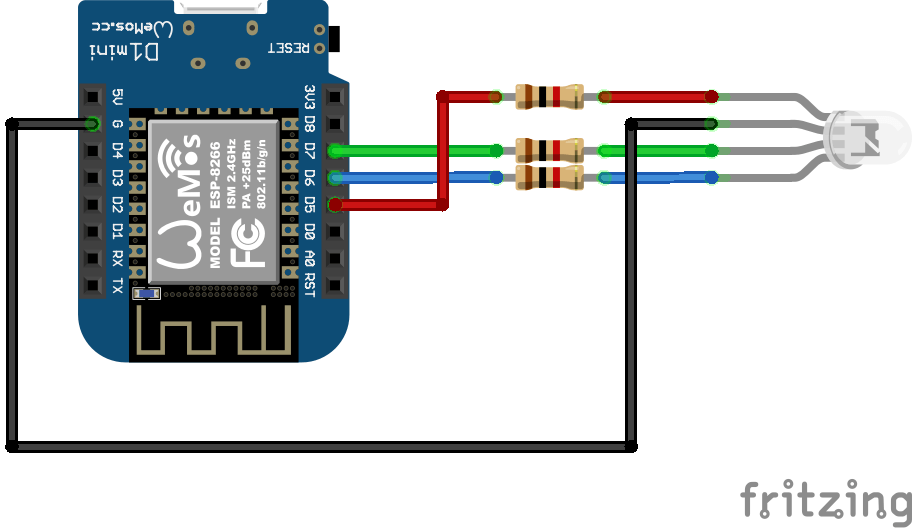
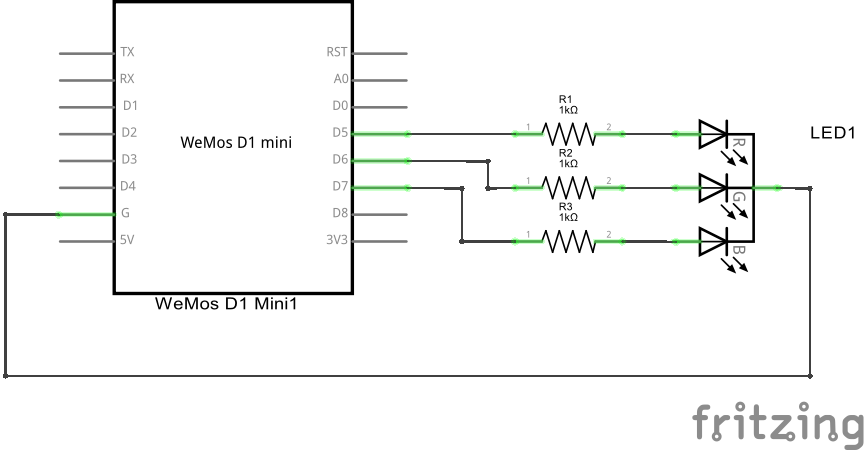
Schematics
Here is a schematic and layout showing the required connection for the Wemos MIni and RGB led
Code
[codesyntax lang=”cpp”]
#include <ESP8266WiFi.h>

const char* ssid = "iainhendry";
const char* password = "iain061271";

int redPin = D5;
int greenPin = D6;
int bluePin = D7;

WiFiServer server(80);

void setup()
{
  Serial.begin(115200);
  delay(10);

  //set up LEDs
  pinMode(redPin, OUTPUT);
  digitalWrite(redPin, LOW);
  pinMode(greenPin, OUTPUT);
  digitalWrite(greenPin, LOW);
  pinMode(bluePin, OUTPUT);
  digitalWrite(bluePin, LOW);

  // Connect to WiFi network
  Serial.print("Connecting to ");
  Serial.println(ssid);

  WiFi.begin(ssid, password);

  while (WiFi.status() != WL_CONNECTED) {
    delay(500);
    Serial.print(".");
  }
  Serial.println("WiFi connected");

  // Start the server
  server.begin();
  Serial.println("Server started");

  // Print the IP address
  Serial.print("Use this URL : ");
  Serial.print("http://");
  Serial.print(WiFi.localIP());
  Serial.println("/");

}

void loop() {
  // Check if a client has connected
  WiFiClient client = server.available();
  if (!client) {
    return;
  }

  // Wait until the client sends some data
  Serial.println("new client");
  while(!client.available()){
    delay(1);
  }

  // Read the first line of the request
  String request = client.readStringUntil('\r');
  Serial.println(request);
  client.flush();

  // Match the request
  int redvalue = LOW;
  if (request.indexOf("/REDLED=ON") != -1) {
    digitalWrite(redPin, HIGH);
    redvalue = HIGH;
  }
  if (request.indexOf("/REDLED=OFF") != -1){
    digitalWrite(redPin, LOW);
    redvalue = LOW;
  }

  int greenvalue = LOW;
  if (request.indexOf("/GREENLED=ON") != -1) {
    digitalWrite(greenPin, HIGH);
    greenvalue = HIGH;
  }
  if (request.indexOf("/GREENLED=OFF") != -1){
    digitalWrite(greenPin, LOW);
    greenvalue = LOW;
  }

  int bluevalue = LOW;
  if (request.indexOf("/BLUELED=ON") != -1) {
    digitalWrite(bluePin, HIGH);
    bluevalue = HIGH;
  }
  if (request.indexOf("/BLUELED=OFF") != -1){
    digitalWrite(bluePin, LOW);
    bluevalue = LOW;
  }


  // Return the response
  client.println("HTTP/1.1 200 OK");
  client.println("Content-Type: text/html");
  client.println(""); //  do not forget this one
  client.println("<!DOCTYPE HTML>");
  client.println("<html>");

  client.print("Red led pin is now: ");
  if(redvalue == HIGH) {
    client.print(" On");
  } else {
    client.print(" Off");
  }
  client.println("<br>");

  client.print("Green led pin is now: ");
  if(greenvalue == HIGH) {
    client.print(" On");
  } else {
    client.print(" Off");
  }
  client.println("<br>");

  client.print("Blue led pin is now: ");
  if(bluevalue == HIGH) {
    client.print(" On");
  } else {
    client.print(" Off");
  }
  client.println("<br>");

  client.println("<table>");
  client.println("<tr><td>");
  client.println("<a href=\"/REDLED=ON\"><input type=\"button\" value=\"RED LED ON\"></a><br>");
  client.println("</td><td>");
  client.println("<a href=\"/REDLED=OFF\"><input type=\"button\" value=\"RED LED OFF\"></a><br>");
  client.println("</td></tr>");
  client.println("<tr><td>");
  client.println("<a href=\"/GREENLED=ON\"><input type=\"button\" value=\"GREEN LED ON\"></a><br>");
  client.println("</td><td>");
  client.println("<a href=\"/GREENLED=OFF\"><input type=\"button\" value=\"GREEN LED OFF\"></a><br>");
  client.println("</td></tr>");
  client.println("<tr><td>");
  client.println("<a href=\"/BLUELED=ON\"><input type=\"button\" value=\"BLUE LED ON\"></a><br>");
  client.println("</td><td>");
  client.println("<a href=\"/BLUELED=OFF\"><input type=\"button\" value=\"BLUE LED OFF\"></a><br>");
  client.println("</td></tr>");
  client.println("</table>");
  client.println("</html>");

  delay(1);
  Serial.println("Client disconnected");
  Serial.println("");

}
[/codesyntax]
Testing
navigate to the web page and click on the buttons, you can open the serial monitor to verify the IP address.
Links
You can pick up one of these from about $5
D1 mini – Mini NodeMcu 4M bytes Lua WIFI Internet of Things development board based ESP8266 by WeMos
