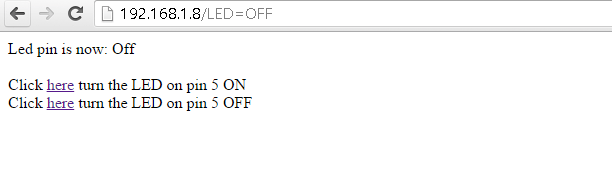
In this example we will create a basic webserver example using our Wemos D1, it will connect to your Wifi network and then you will navigate to a URL and a basic page will appear. This page will display 2 links , one will switch on an led connected to D5 and the other option will switch the led off.
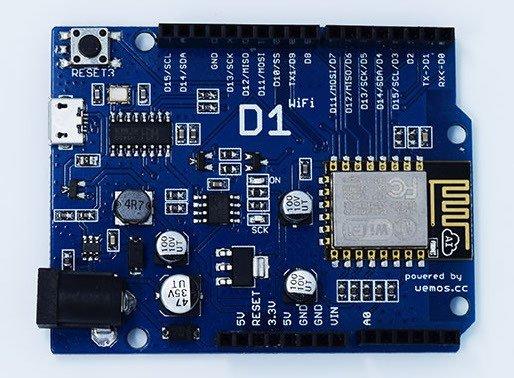
The D1 is a low cost board that as you can see is in an ‘Arduino Uno’ form factor, that is you can potentially fit shields to this board. It does only have one Analog input and less outputs are available but of course for an IoT project this may be perfect, it also supports SPI and I2C which means of course tehre are still a large amount of sensors and modules available that you can connect to the D1.
Of course there are ways of adding extra inputs and outputs through additional electronics, so to me that’s not an issue. The cost is also very good, you can pick up a Wemos D1 for about £10 whereas an Arduino Uno and a CC3000 Wifi shield will set you back about £40.
Parts
1 x Wemos D1 or D2
1 x USB cable
1 x LED and resistor or use a module
Code
[codesyntax lang=”cpp”]
#include <ESP8266WiFi.h>

const char* ssid = "ssid name";
const char* password = "ssid password";

int ledPin = D5;
WiFiServer server(80);

void setup() {
  Serial.begin(115200);
  delay(10);


  pinMode(ledPin, OUTPUT);
  digitalWrite(ledPin, LOW);

  // Connect to WiFi network
  Serial.println();
  Serial.println();
  Serial.print("Connecting to ");
  Serial.println(ssid);

  WiFi.begin(ssid, password);

  while (WiFi.status() != WL_CONNECTED) {
    delay(500);
    Serial.print(".");
  }
  Serial.println("");
  Serial.println("WiFi connected");

  // Start the server
  server.begin();
  Serial.println("Server started");

  // Print the IP address
  Serial.print("Use this URL : ");
  Serial.print("http://");
  Serial.print(WiFi.localIP());
  Serial.println("/");

}

void loop() {
  // Check if a client has connected
  WiFiClient client = server.available();
  if (!client) {
    return;
  }

  // Wait until the client sends some data
  Serial.println("new client");
  while(!client.available()){
    delay(1);
  }

  // Read the first line of the request
  String request = client.readStringUntil('\r');
  Serial.println(request);
  client.flush();

  // Match the request

  int value = LOW;
  if (request.indexOf("/LED=ON") != -1) {
    digitalWrite(ledPin, HIGH);
    value = HIGH;
  }
  if (request.indexOf("/LED=OFF") != -1){
    digitalWrite(ledPin, LOW);
    value = LOW;
  }


  // Return the response
  client.println("HTTP/1.1 200 OK");
  client.println("Content-Type: text/html");
  client.println(""); //  do not forget this one
  client.println("<!DOCTYPE HTML>");
  client.println("<html>");

  client.print("Led pin is now: ");

  if(value == HIGH) {
    client.print("On");
  } else {
    client.print("Off");
  }
  client.println("<br><br>");
  client.println("Click <a href=\"/LED=ON\">here</a> turn the LED on pin 5 ON<br>");
  client.println("Click <a href=\"/LED=OFF\">here</a> turn the LED on pin 5 OFF<br>");
  client.println("</html>");

  delay(1);
  Serial.println("Client disconnected");
  Serial.println("");

}
[/codesyntax]
Results
Open the serial monitor , all going well and you will see the IP address and messages like the following

Using your favourite web browser navigate to the IP above